Training Your Dog to Stay
Training your dog to stay (for many owners, anyway) is often a depressing exercise in futility. You've probably tried everything you can think of, read multiple articles online and books from the library, and heard every imaginable "secret trick" to getting your pooch to stay. And the result?
Nada. Your dog either ignores you and continues to do whatever he wants, or he might listen for a few seconds but then breaks the stay. It's so frustrating!
But don't give up yet... because I know you and your dog can master the stay command if you follow some straight-forward steps!
As a certified dog trainer, I have worked with oodles of dogs and puppies. From little dogs to giant dogs, timid dogs to aggressive dogs, I've never not been able to train a dog to stay.
Sure, sometimes it takes a little longer for a dog to catch on, but with consistency and patience a solid stay has always come.
Now, depending on whether you want to teach your dog a sit-stay or a down-stay, the steps to follow differ slightly. I'll focus on the sit-stay in this article, though.
For this exercise, I'm going to assume that your dog already knows how to sit. It's really important to remember not to rush training, and take your time on each step.
So be absolutely sure that Rover is consistently obeying your sit command before attempting training your dog to stay!
Training Toolbox
- 6 foot leather or nylon leash (for the first 4 weeks)
- a dog training collar that you've chosen for your dog's temperament
- a few small, smelly dog training treats
- a 30 to 50 foot long line for using after you've been practicing the exercise for about 4 weeks
Four Paws on the Floor
Let's start with a sit-stay command. Since training your dog to sit is usually the first command that owners teach their dogs, it's easy to transition into a stay.
Because most training is done with the dog at your left side, you'll want to start getting him to sit there instead of in front of you so as not to confuse things.
When most people train their dog to do a sit-stay, they miss a really important step. They command "stay", and leave the dog while chanting "stay, stay, stay... OK, come!"
Gack. There is so much wrong with this whole scenario that I don't know where to start!
First of all, you can't expect your dog to be able to stay when you leave him the very first time he hears that command. He's never been taught what stay means! Secondly, please stop chanting the word "stay" over and over...
I teach First Command Response, where your dog learns to listen to your first command every time, and holds that command until told otherwise (no matter the distractions!). Thirdly, saying "OK, come" right after chanting stay is waaaay too many commands all in one shot, and is confusing for a young, green dog.
So, how do you get started training your dog to stay? Always begin by staying right beside your dog the entire time he is on a stay. This is called a sit-for-examination. In doggy language, that's "sit nicely with four paws on the floor"! Ready? Let's get started...
A Sit-for-Examination Needs to be Taught First
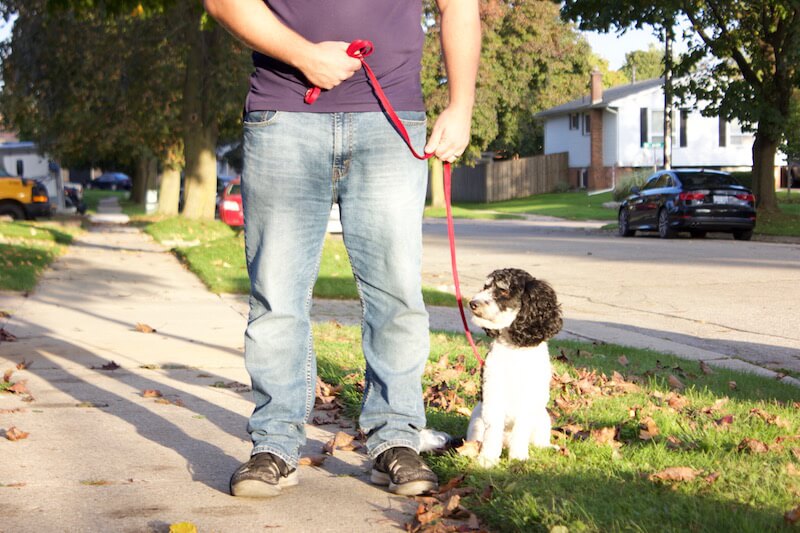
Take a minute to get yourself ready for training your dog to stay. Have a few treats in your right pocket, where your dog can't see them. Start by having your dog sit at your left side with his collar on and leash attached. This is called heel position.
When training your dog to stay, make sure that the leash stays loose, and that you're not pulling it tightly!
Take a look at the photo above to see what heel position looks like, and how to properly hold the leash.
Now, while your dog is sitting nicely:
- Transfer the entire leash into your left hand so that you're right hand is empty.
- Command "stay" with a calm, firm voice (not shouting) and your empty right hand by moving your open hand, palm facing your dog, from about a foot in front of his face to within a couple inches of his eyes.
- Put both hands back on the leash like at the
beginning of the exercise!
At this point, you should have someone come up to your dog, let him sniff the back of their hand, and then calmly scratch him under the chin. Ask the person to stop petting your dog if he tries to jump up on them so that you can correct him...
If at any time while training your dog to stay, he tries to stand up, jump up, lie down or shake-a-paw:
- SAY NOTHING! Move your right hand all the way to
the metal clasp of the leash (holding the entire leash now in that
hand), loosen the leash for a split second, pop straight up with your
right hand fast and firm, while simultaneously your left hand will
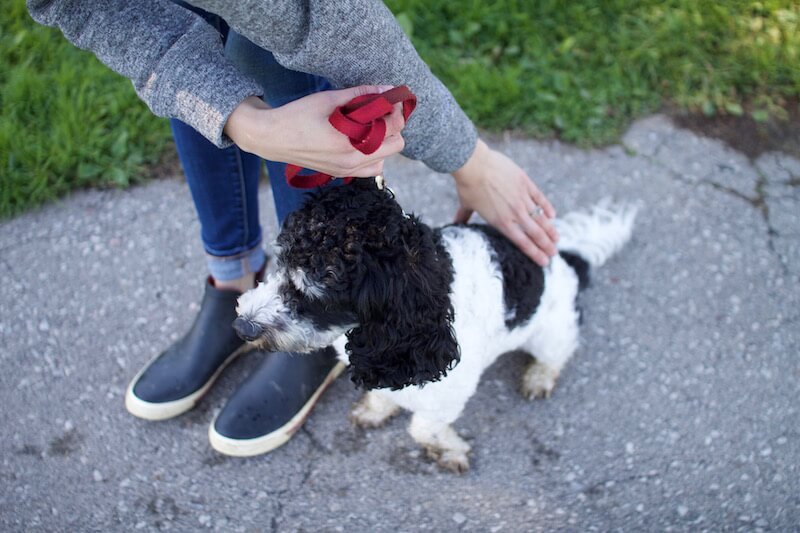
gently push down on your dog's rump.
- Only put 25% pressure on
your dog's rumps, and use 75% pressure to pop up with the leash.
Why? Your dog's neck is the strongest part of his body, and is much stronger than his hips.
Throughout the entire exercise of training your dog to stay, always remain beside your dog with your feet parallel to your dog's paws. Don't turn your feet to face your dog when correcting - instead, twist your upper body as is shown on the photo above.
To perfect the sit-for-examination, you should practice with your dog every day for at least one week before moving on.
The Next Hurdle: Sit-Stay
At this point, you and your dog have been practicing the sit-for-examination for at least a week. Make sure that you don't ever command stay and then leave your dog's side during this week, or you'll sabotage progress with the sit-stay!
Training your dog to stay is going to be very easy now that you've taught your dog a sit-for-exam. So let's take that pre-requisite, and build on it! You already know how to start this exercise:
- Transfer the entire leash into your left hand.
- Command "stay" with your voice and your right hand signal.
- Put both hands back on the leash like I showed you at the beginning. Your dog should be sitting nice and straight at your left side now in heel position.
Now we're going to add to the exercise...
- Keep both hands on the leash, step out from your dog with your right foot, and simply pivot in front of him. As you step away, be ready with your left hand on the leash to pop up vertically if your dog tries to follow you (but say nothing if you pop up!)
- Once you're directly in front of your dog, stand with one foot in front of the other, as if you're getting ready to run a race. Why? You are now a half step closer to your dog in case he tries to move out of the sit.
- At the same time, place your hands in a "pulley" technique on the leash, with your left hand ready to slide down the leash all the way to the clasp to pop up firmly if your dog tries to move. Your right hand will simply pull the leash out of your way.
Just like the sit-for-exam, your dog is not allowed to lie down, stand up, or jump up while training your dog to stay. Sit means sit! If Rover does try to move out of the sit, your correction is going to be a bit different than last time.
- SAY NOTHING! Don't repeat "sit", and don't repeat "stay"... remember, first command response!
- Slide your left hand down the leash until you're touching the metal clasp, loosen the leash for a split second, and then pop straight up vertically and loosen it again. The leash should only go tight for ONE second!
- Don't try pushing down your dog's rump at the same time - you'll lose precious time, and all that is needed to get your dog's bum back down is that pop up.
- After correcting, stand upright again and be ready to repeat if your dog tries to move. Remember, you can't pop your pooch up if you don't catch it on time and he lies all the way down. That's too harsh...
If this happens, coax him up by wiggling your fingers above his nose and clucking your tongue (but don't repeat the command).
As with all training, you only have a 1.5 second window of opportunity to get in there and correct your dog in order for it to make sense to him. So work on your reflexes!
How to Finish the Exercise When Training Your Dog to Stay
When you're training your dog to stay, you always need to return to your dog's side to finish the exercise. This gives him a very clear start and end point.
So slide your left hand down to the metal clasp as you return to your dog's side, and this is where you praise him for a job well done! He's liable to get excited at your return and praise, so make sure that he stays sitting.
Now you can either repeat the exercise, or let him go with the release command that we learned above. Great job!
Practice, Practice, Practice
I know, I know, it's starting to feel like elementary school again.
But really, you can't expect your dog to listen to you if you never
practice the commands. Once you've taught your dog each of the
above exercises, I recommend continuing to practice both of them every
day.
Take it slow, and let your dog become bomb-proof at holding a stay command by very slowly increasing distance, time and distractions.
Once you hit the 6 foot mark, you can start working with a 30 or 50 foot long line to gradually increase the distance away from your dog.
Congratulations on training your dog to stay!
- Home
- Basic Training
- Stay


